Essential Tools for Building Paper Cut Illustrations
January 9, 2023
Whether you’re interested in pursuing a career as a paper illustrator or just want to experiment with a new medium, learning what tools you need is a good place to start. Yes, you could grab yourself a pair of scissors, some construction paper, and glue from your kids backpack and just go ham. But there are a few other tools out there that’ll leave you happier with the final product. And I’m going to save ya a little time by taking the guess work out of it and giving you the info/links you need to use and find them.
There are no affiliated links in this article. I will NOT make any money at all if you click these links. Most of them take you directly to the tools I personally use so you don’t have to go hunting around to figure out what I’m talking about.
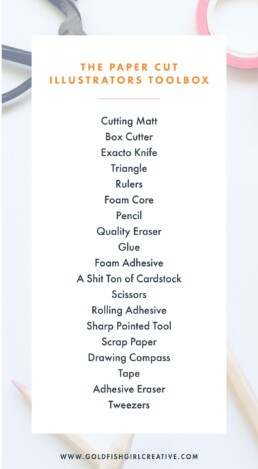
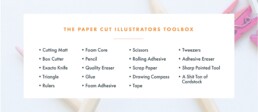
For those of you who just want the list and aren’t interested in any of my links or tips, I get it! I’ve made this graphic for you that lists out all of the paper cut illustration tools (there is also a Pinable version below if you want to save it for later):
Some Quick Notes
- You don’t need to go crazy and buy the most expensive stuff! Seriously, save your money. No need for fancy cutters, crazy rulers, or anything like that.
- The most important thing is that you find yourself some quality adhesive and foam stickies. I highly recommend experimenting and trying out a variety of products to find the ones you feel most confident using.
related article | Custom type: calligraphy vs. hand-lettering
Cutting Matt
There are soooo many cutting mats out there in a trillion different styles and sizes. I actually still use the ones I picked up while I was in college. If you don’t already have one, you’ll want to consider that size your paper cut pieces will be and how much desk space you have.
Box Cutter
You need this for cutting through foam core. You don’t want to sit there half the day trying to safely cut through thick ass board with a little Exacto blade.
Exacto Knife with Spare Blades
Any will do! Again, you don’t need anything fancy here.
Triangle
I use this regularly to make sure I am cutting my bases straight.
If you can find one I suggest a metal triangle. A plastic one works just fine, but if you use it to cut and have a fresh blade, it can cut caught in the triangle or shave slivers off.
Rulers
Just like the triangle, metal is better. I also like the non-slip ones.
It’s helpful to have a standard 12” and a yard ruler, especially if you’re going to do larger pieces. If you planning on staying small, the 12” will work.
Foam Core
This is really useful for creating a stable base for your paper cut and for when you want to create deeper layers. Layering up 10 foam stickies is not only a pain in the ass, but it is also much less stable.
I keep a variety of thicknesses on hand.
Pencil
I use a mechanical, but that’s just my preference. Just make sure that it’s easy to erase.
Quality Eraser
It sounds simple and something a lot of people will look right over, but this is actually super useful. If you are drawing and marking up your paper so you know where to cut, you’re going to want a quality eraser to remove those marks later.
I LOVE this eraser (linked below)! The only con is that it’s on the soft end if you are a vigorous eraser then it’ll start to break up.
Glue
These are the glues that I use, but like I said earlier, go experiment! I use the little Elmer’s tube for tiny details and the E6000 for gluing foam core pieces together
Foam Adhesive
Again, try out a bunch of different adhesives! Just make sure that whatever you get that it’s permanent. For some reason non-permanent adhesive is a thing and that’s not going to do you any good.
Like the foam core, I keep a variety of sizes, widths, and depths on hand. Linked below are some of my go-tos.
A Shit Ton of Cardstock
There are soooo many places to get cardstock. If you’re just starting out or dabbling, I suggest just picking up some of those multi-color packs from Michaels to give yourself a nice selection to play with. Some other fun cardstocks include recycled, metallic, sparkle, patterned, textured, etc. Go play!
Some things to consider when buying your paper is how much you’ll need, the cost, and size of sheets.
As far as weight of your cardstock, you’ll want it heavy enough that it holds its form, but not too heavy that it kills your hand to cut through it. Something in the 65 lb range works well.
Scissors
I keep a standard pair on hand as well a small pair for details.
Rolling Adhesive
Again, make sure you get the permanent stuff. I love this adhesive because you don’t have to worry about it drying! Ya roll if on and you’re good. The downside is that it can get expensive and all the plastic refills are incredibly wasteful.
Sharp Pointed Tool
I use this to apply glue to tiny paper details. It’s actually a tool I used for bookmaking a few years back, but it works perfectly for paper cutting too.
Tweezers
I just use a cheap pair from target. This is defiantly a must for your paper cutting tool box.
Scrap Paper
For drawing things out or removing excess glue.
Tape
This is just for temporarily holding things in place so you want to avoid duct tape and other heavy duty adhesives because they’ll rip your paper or ruin the surface.
Adhesive Eraser
BEST THING EVER!! If there is extra adhesive after applying or residue left behind when removing pieces, this will take it all off without leaving any marks or damaging the paper. I am obsessed!
If you have any questions or you have a suggested tool for my list leave me a comment below!!
Save for later!